How to Use Ashby (our ATS)
🪜 Using Ashby: A Step-by-Step Guide for Recruitment Agencies
1Step 1: Access Ashby
-
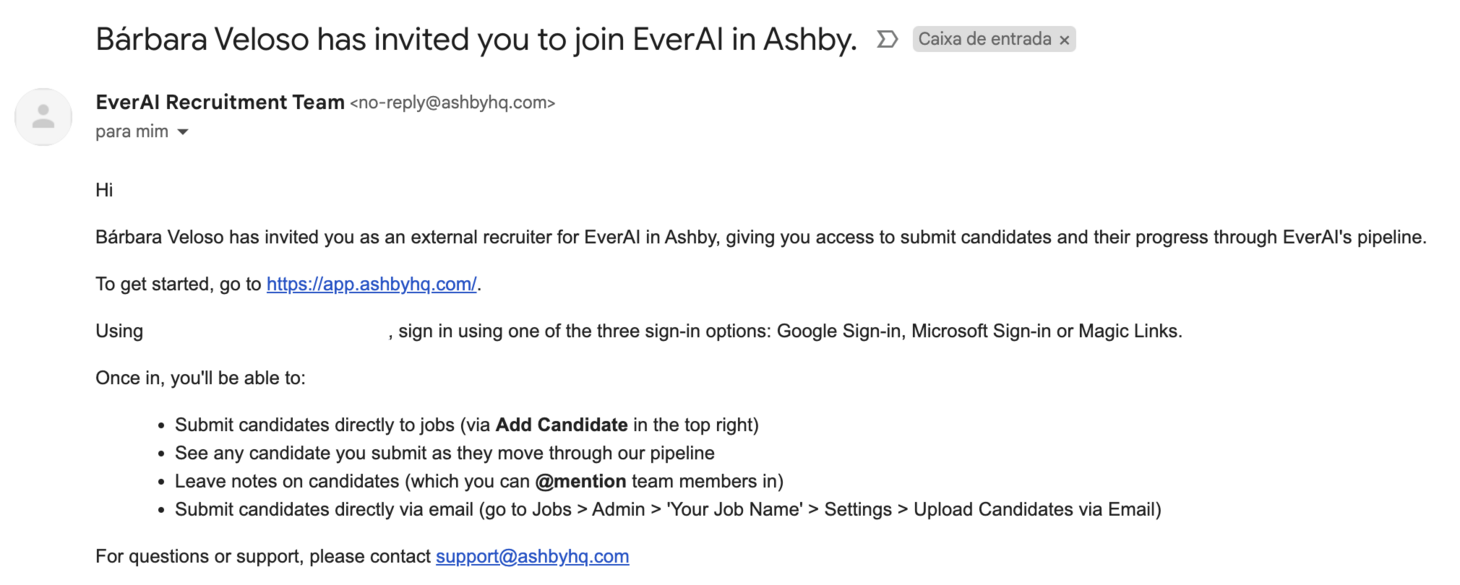
Receive Your Invite: Upon being granted access, you should receive an automatic invitation from Ashby. An example of the invite email is shown below 👇
-
Log In:
- Use the credentials provided in the email to log into Ashby using this link.
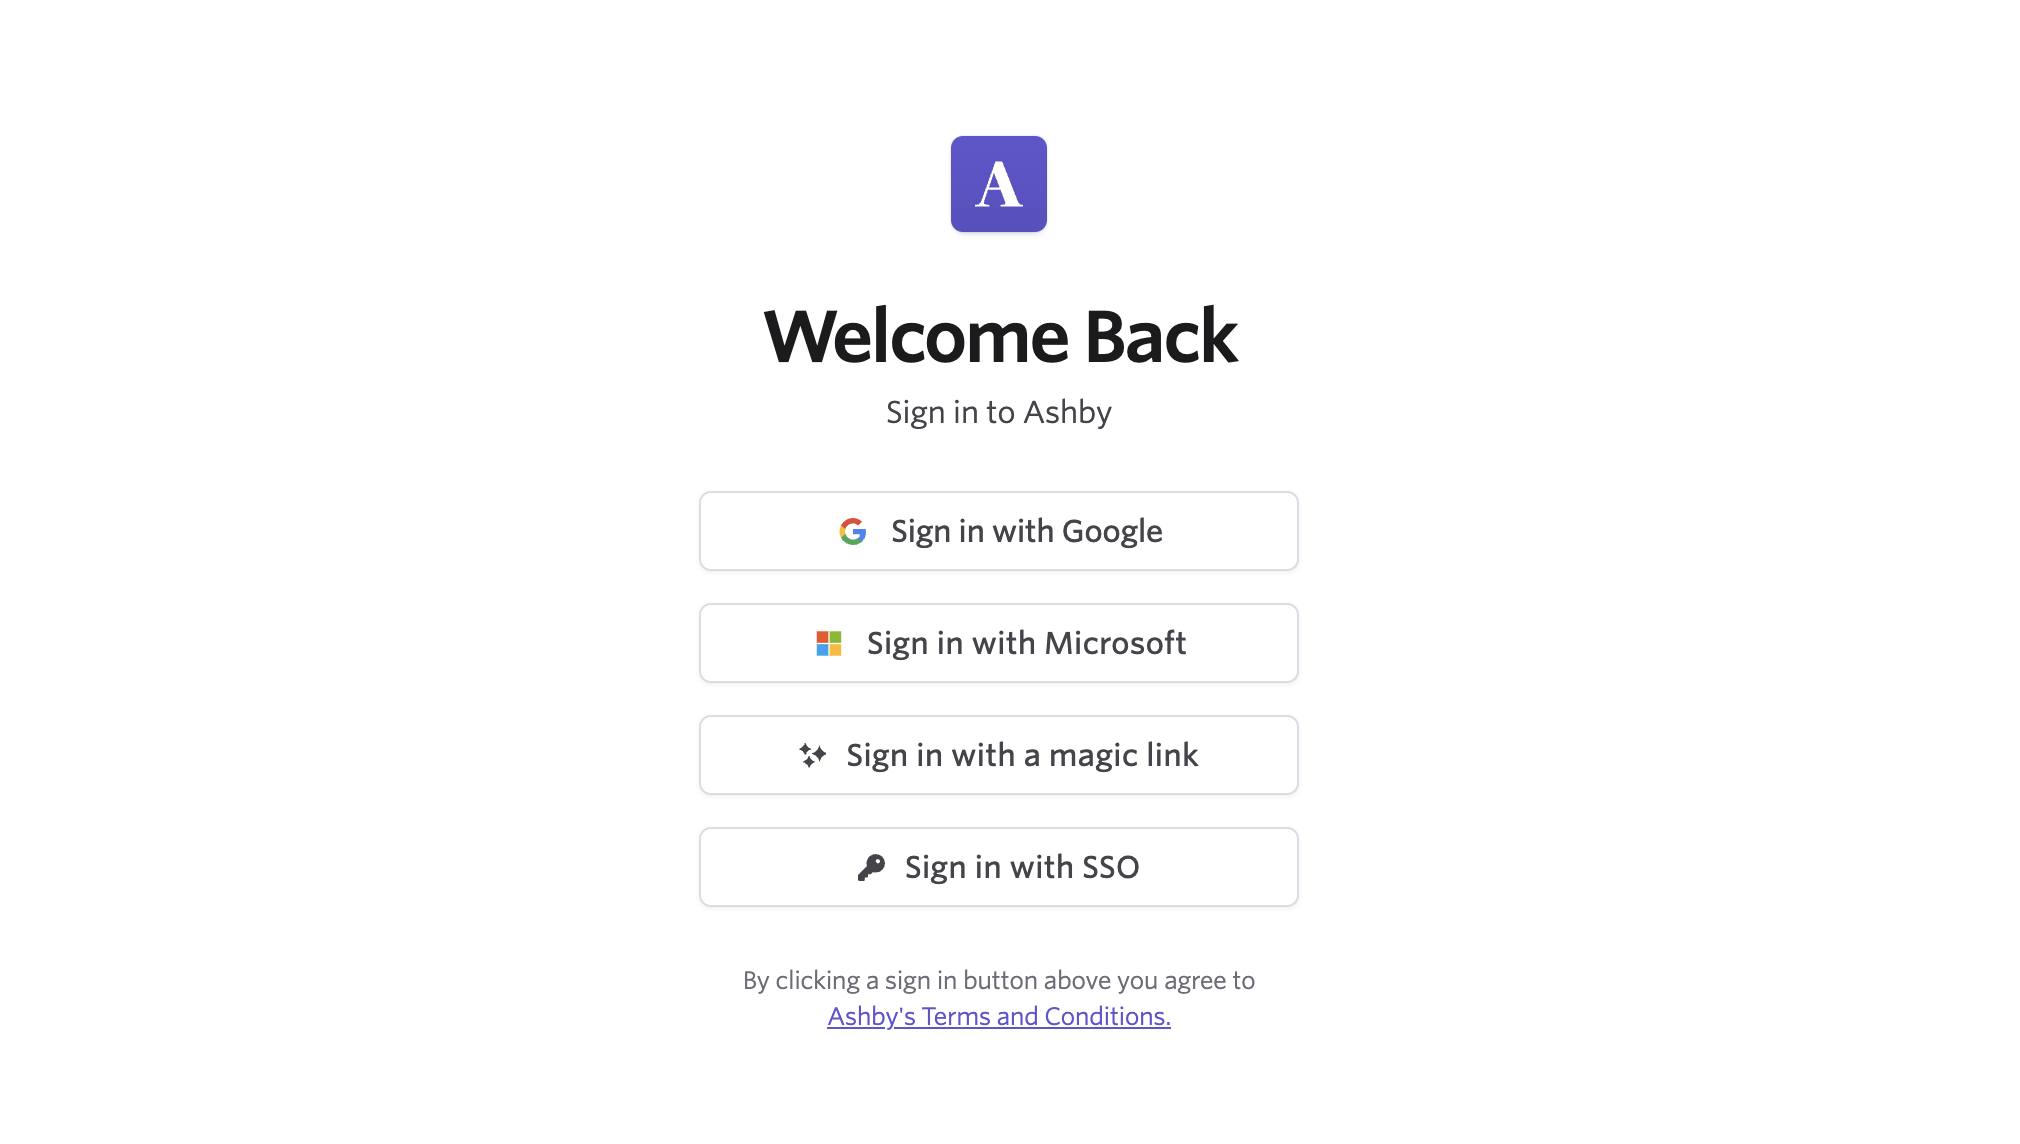
- You should be able to see the log in options, as below 👇
- If you encounter any login issues, check with your TA contact to confirm your account setup.
-
Familiarize Yourself:
- Once logged in, take some time to explore the Ashby interface. Key sections to familiarize yourself with include:
- Candidate Dashboard: Manage candidates, their statuses, and associated details.
- Job Requisitions: View job openings assigned to you and their hiring pipelines.
- Reports and Metrics: Access data-driven insights for recruitment performance.
- Once logged in, take some time to explore the Ashby interface. Key sections to familiarize yourself with include:
2Step 2: Navigating the Home Page - Key Areas and Features
-
Welcome to Your Ashby Home Screen:
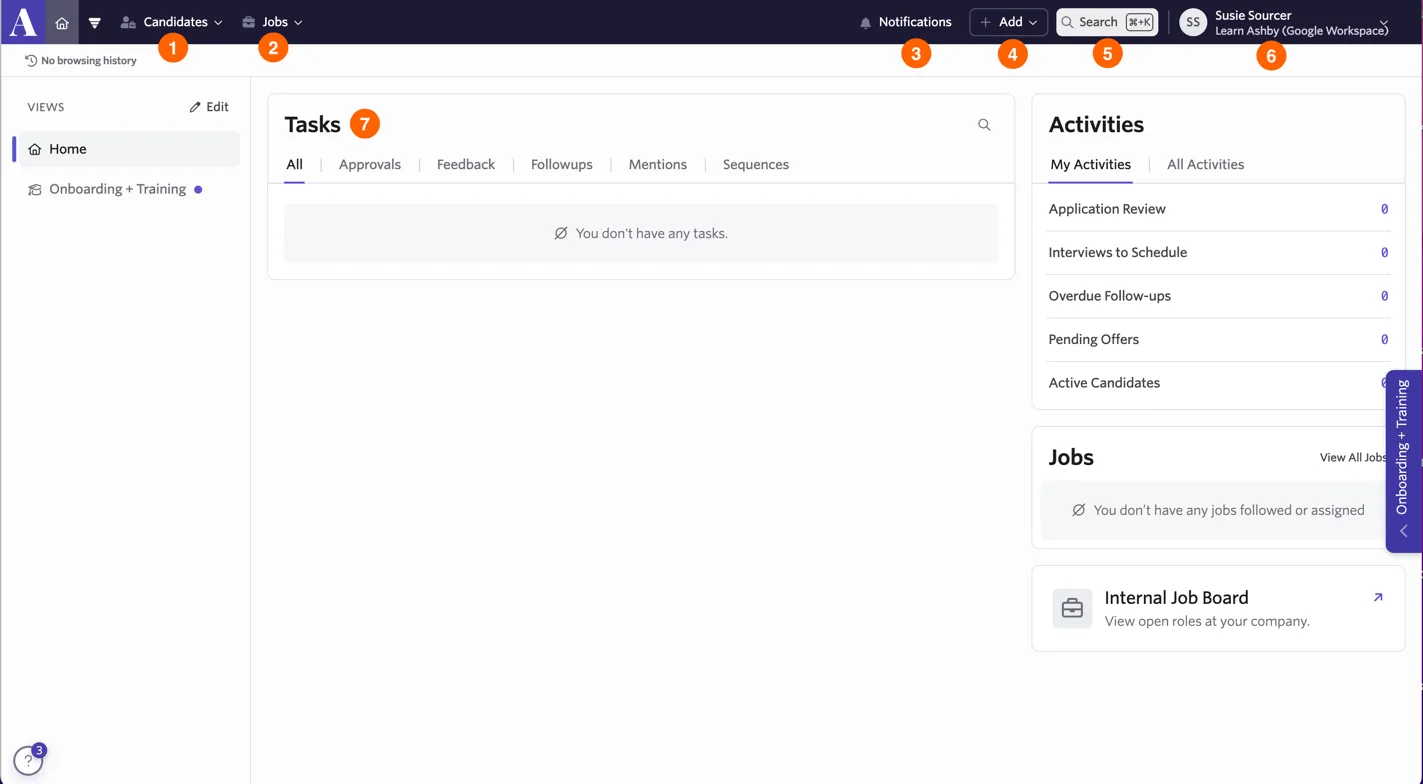
- Once logged in, you'll arrive at your Home Screen, the central hub for accessing Ashby's key features. From here, you can efficiently manage, add, and track candidates throughout the recruitment process.
- Once logged in, you'll arrive at your Home Screen, the central hub for accessing Ashby's key features. From here, you can efficiently manage, add, and track candidates throughout the recruitment process.
-
Get to know and Understand the Key things you will need:
The screenshot above ☝️ outlines the seven key areas of the Ashby home page, designed to streamline your recruitment workflow:- Candidates:
- Access the Candidate Pipeline to view where candidates are in the hiring process.
- Use Candidate Search to filter candidates with basic or advanced search options.
- Jobs:
- Open the Jobs Dashboard to see a high-level summary of candidates across different stages for each job.
- Notifications:
- View and manage your notifications within Ashby from this section.
- Add:
- Use the +Add button to manually add a new candidate to a job requisition.
- Search:
- Quickly search for candidates or jobs using Command + K (Mac) or CTRL + K (Windows).
- Personal Settings:
- Update your profile settings such as avatar, timezone, and notification preferences.
- Tasks:
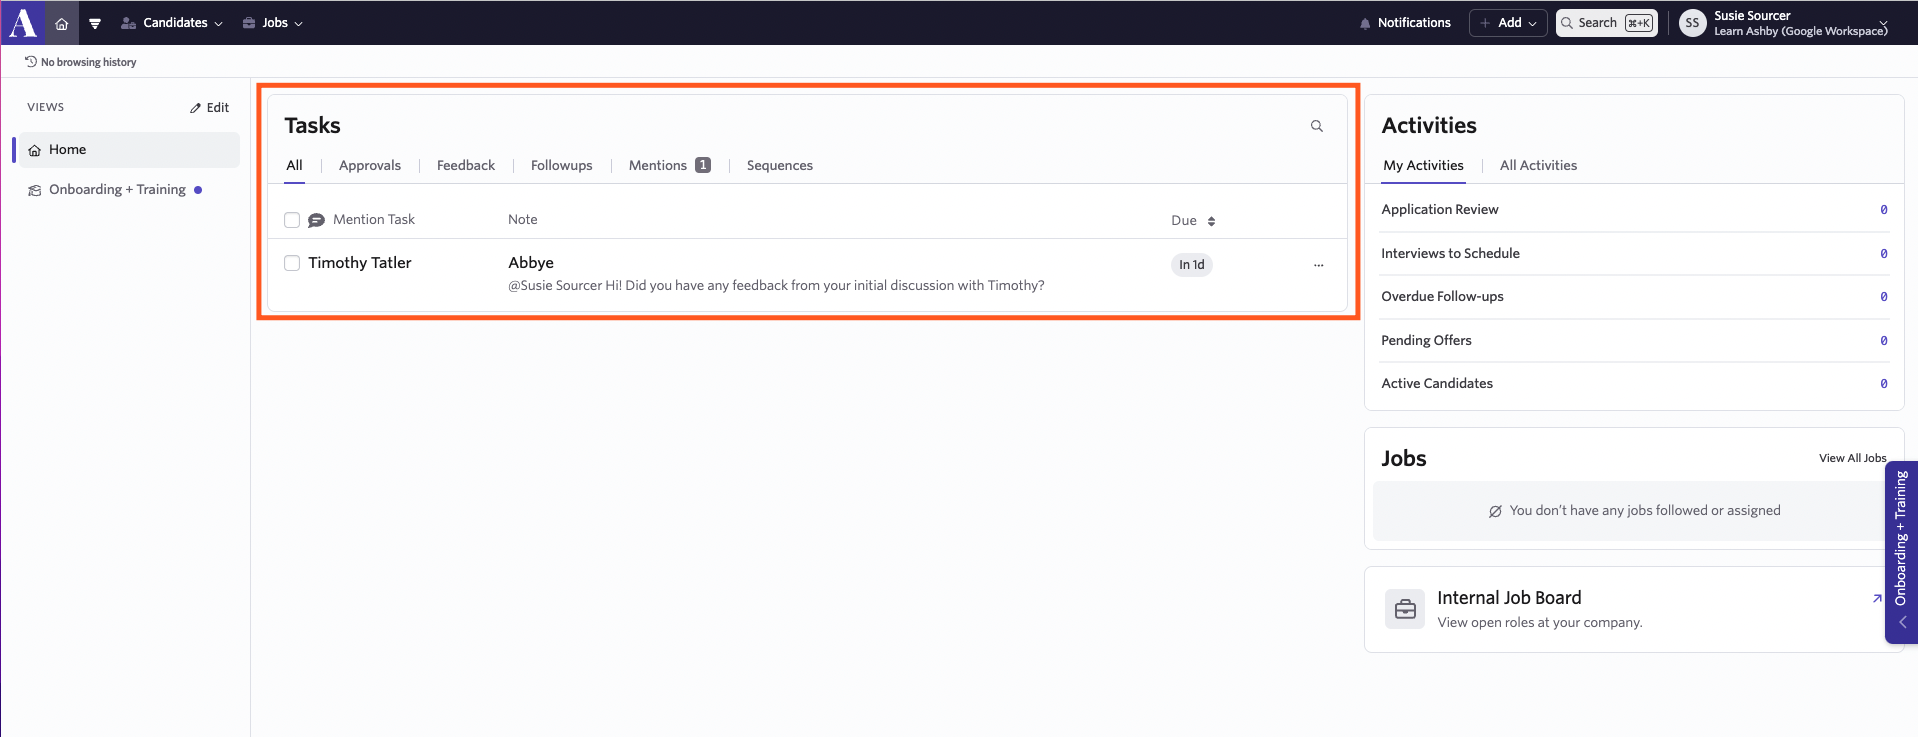
- Access your tasks when you're @mentioned in notes on candidate profiles. You can respond directly from this section.
- Candidates:
3Step 3: Add New Candidates
-
Navigate to Add Candidate:
- Click the +Add button, located in the top-right corner.
- Select Add Candidate from the dropdown.
-
Enter Candidate Information:
- Upload the CV:
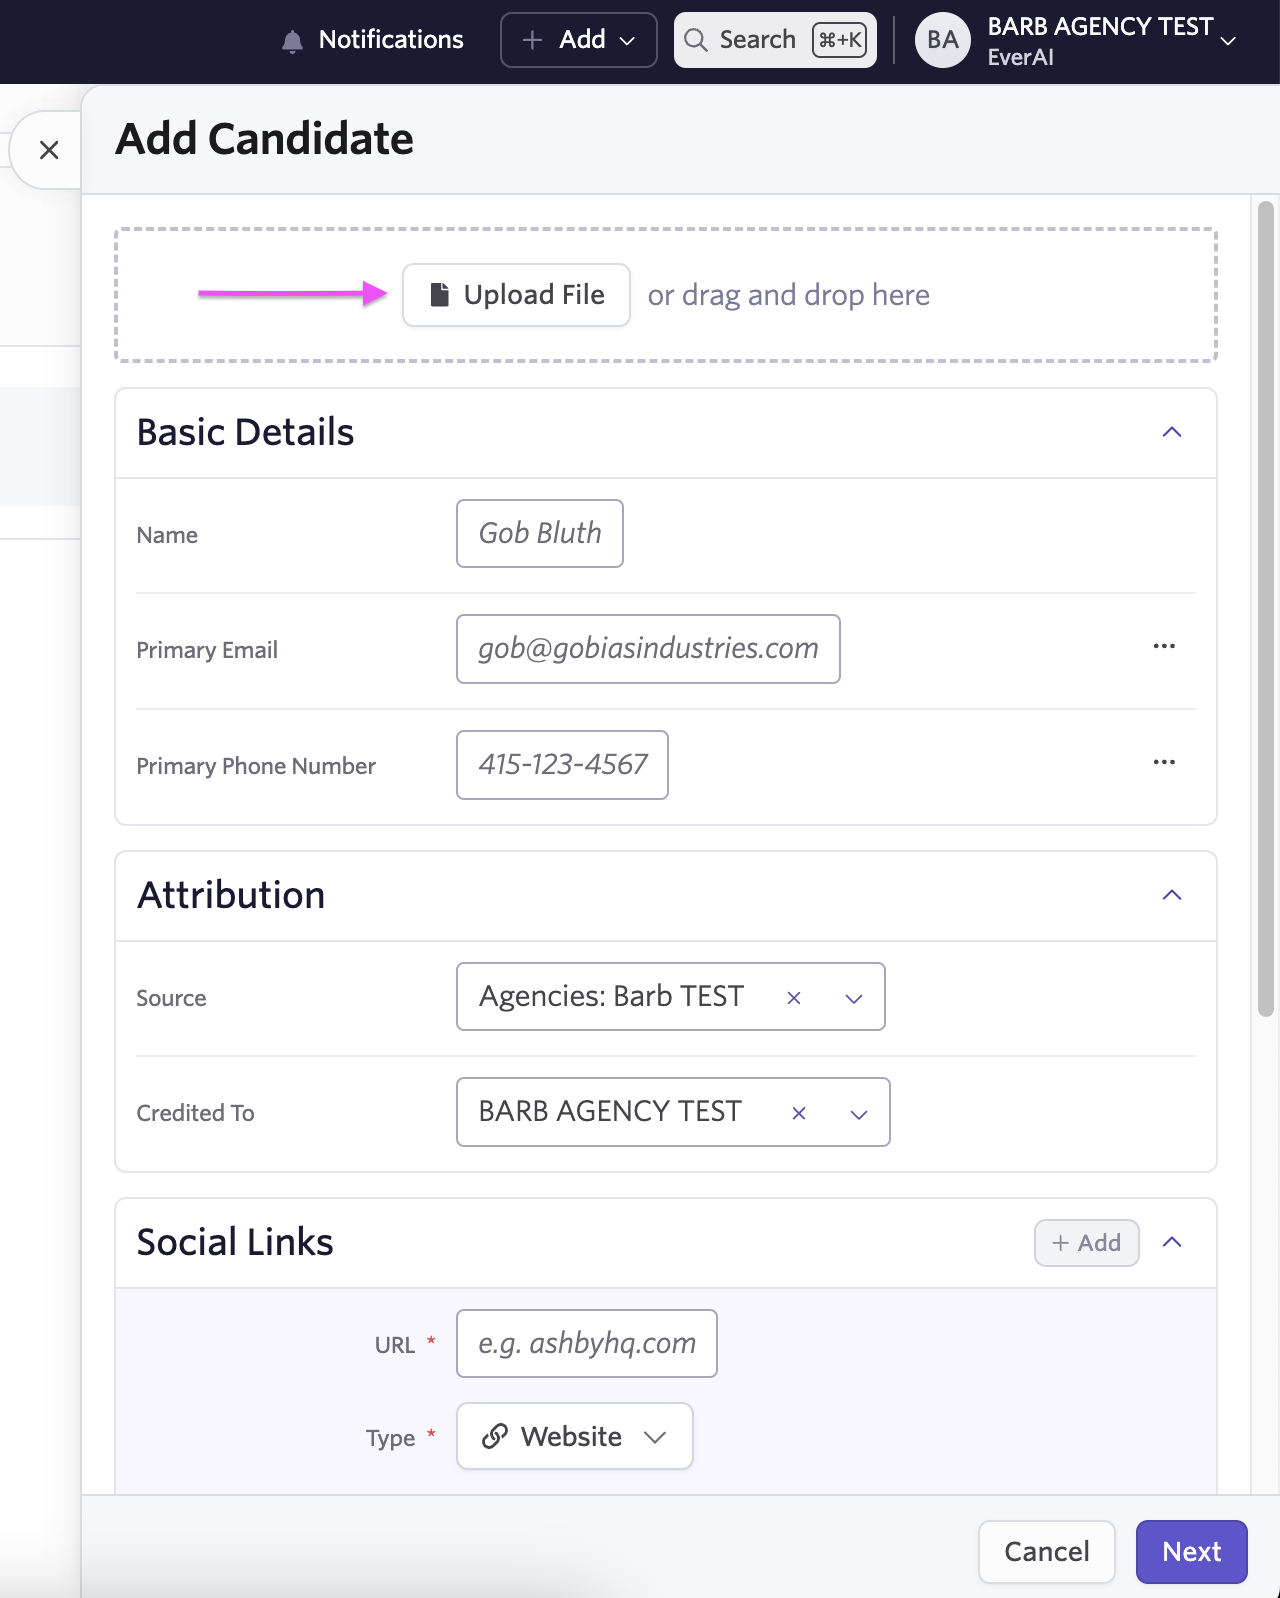
- Use the CV Upload feature to add the candidate's resume.
- Ashby will automatically parse and fill in most of the candidate's details, such as their name, email, and phone number.
- Illustration here:
- Verify or Fill In Missing Information:
- Double-check the parsed information and manually fill in any missing details:
- Name: Ensure the candidate's full name is accurate.
- Email: Confirm the email address provided.
- Phone Number: Add or verify their contact number.
- Double-check the parsed information and manually fill in any missing details:
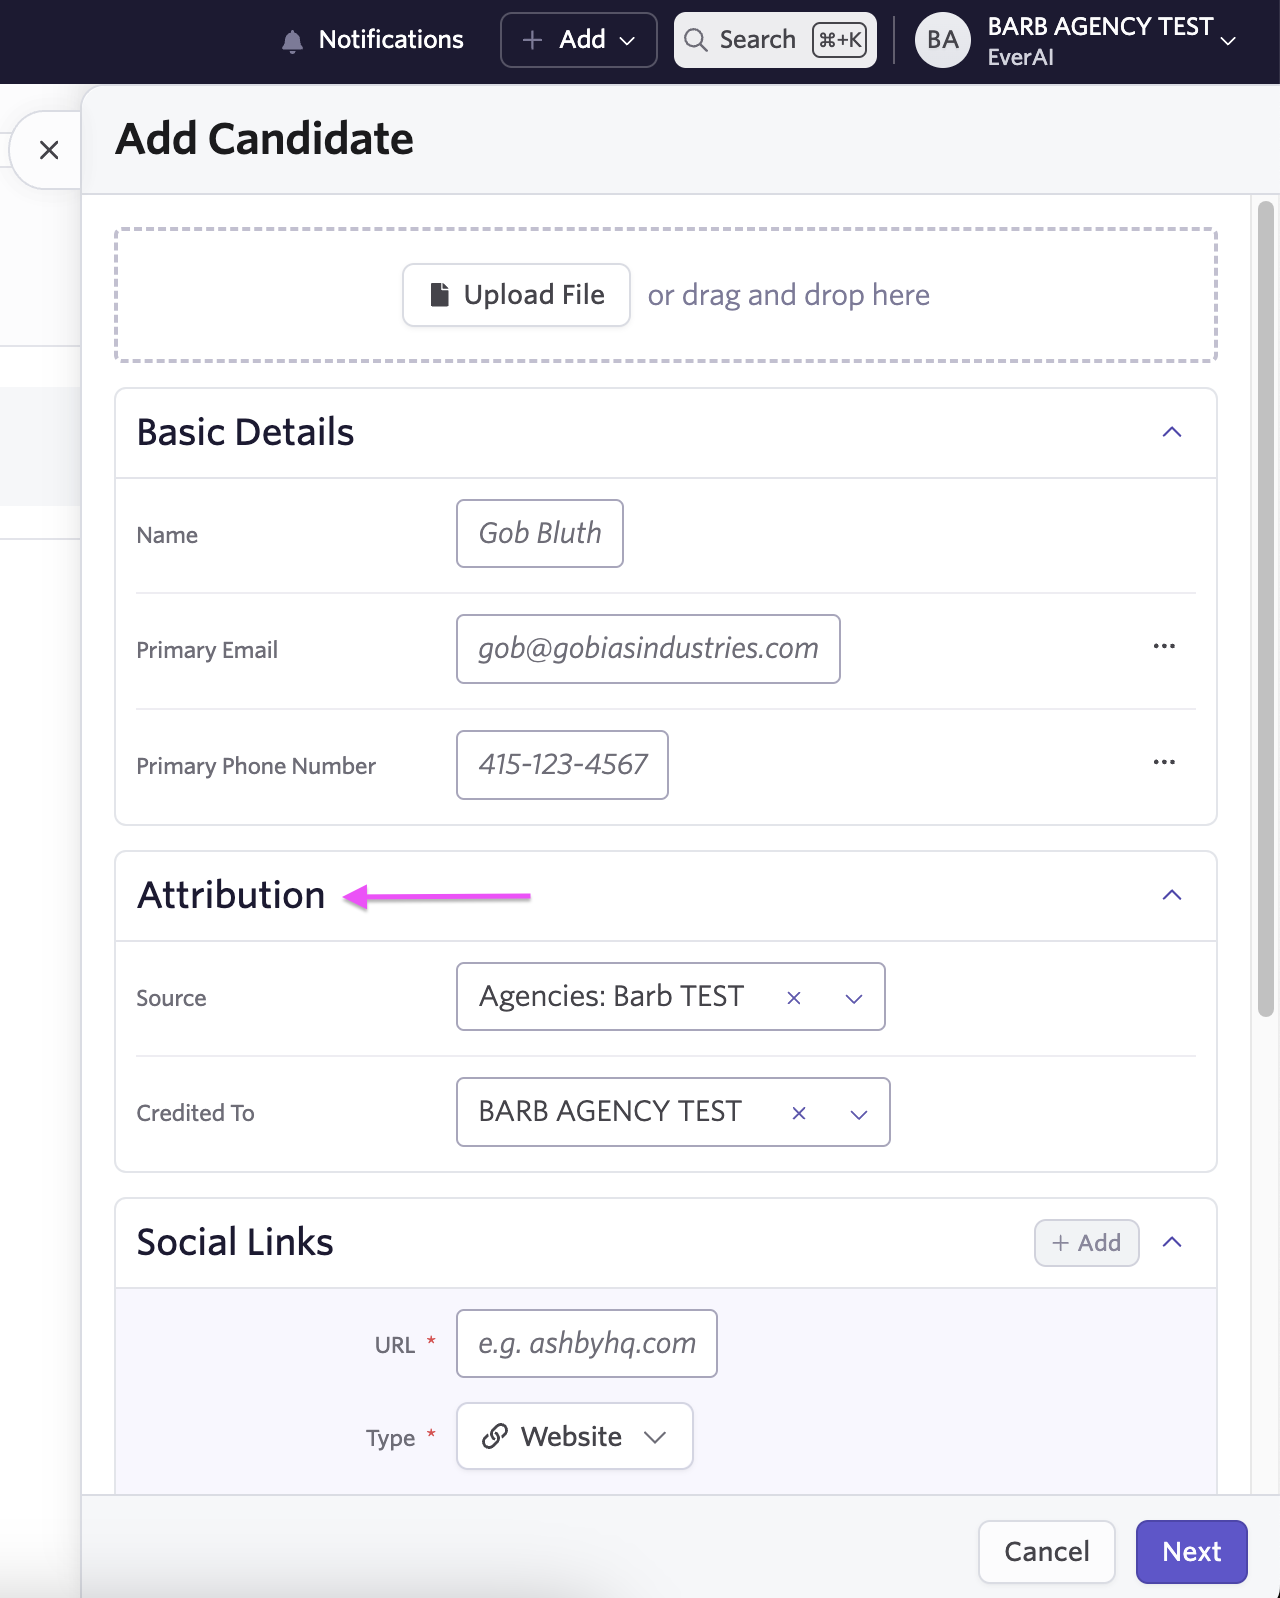
- Verify the Attribution (Ownership) of the Candidate:
- When you add a candidate to Ashby, the platform automatically attributes the source to you and your recruitment agency.
- Illustration here:
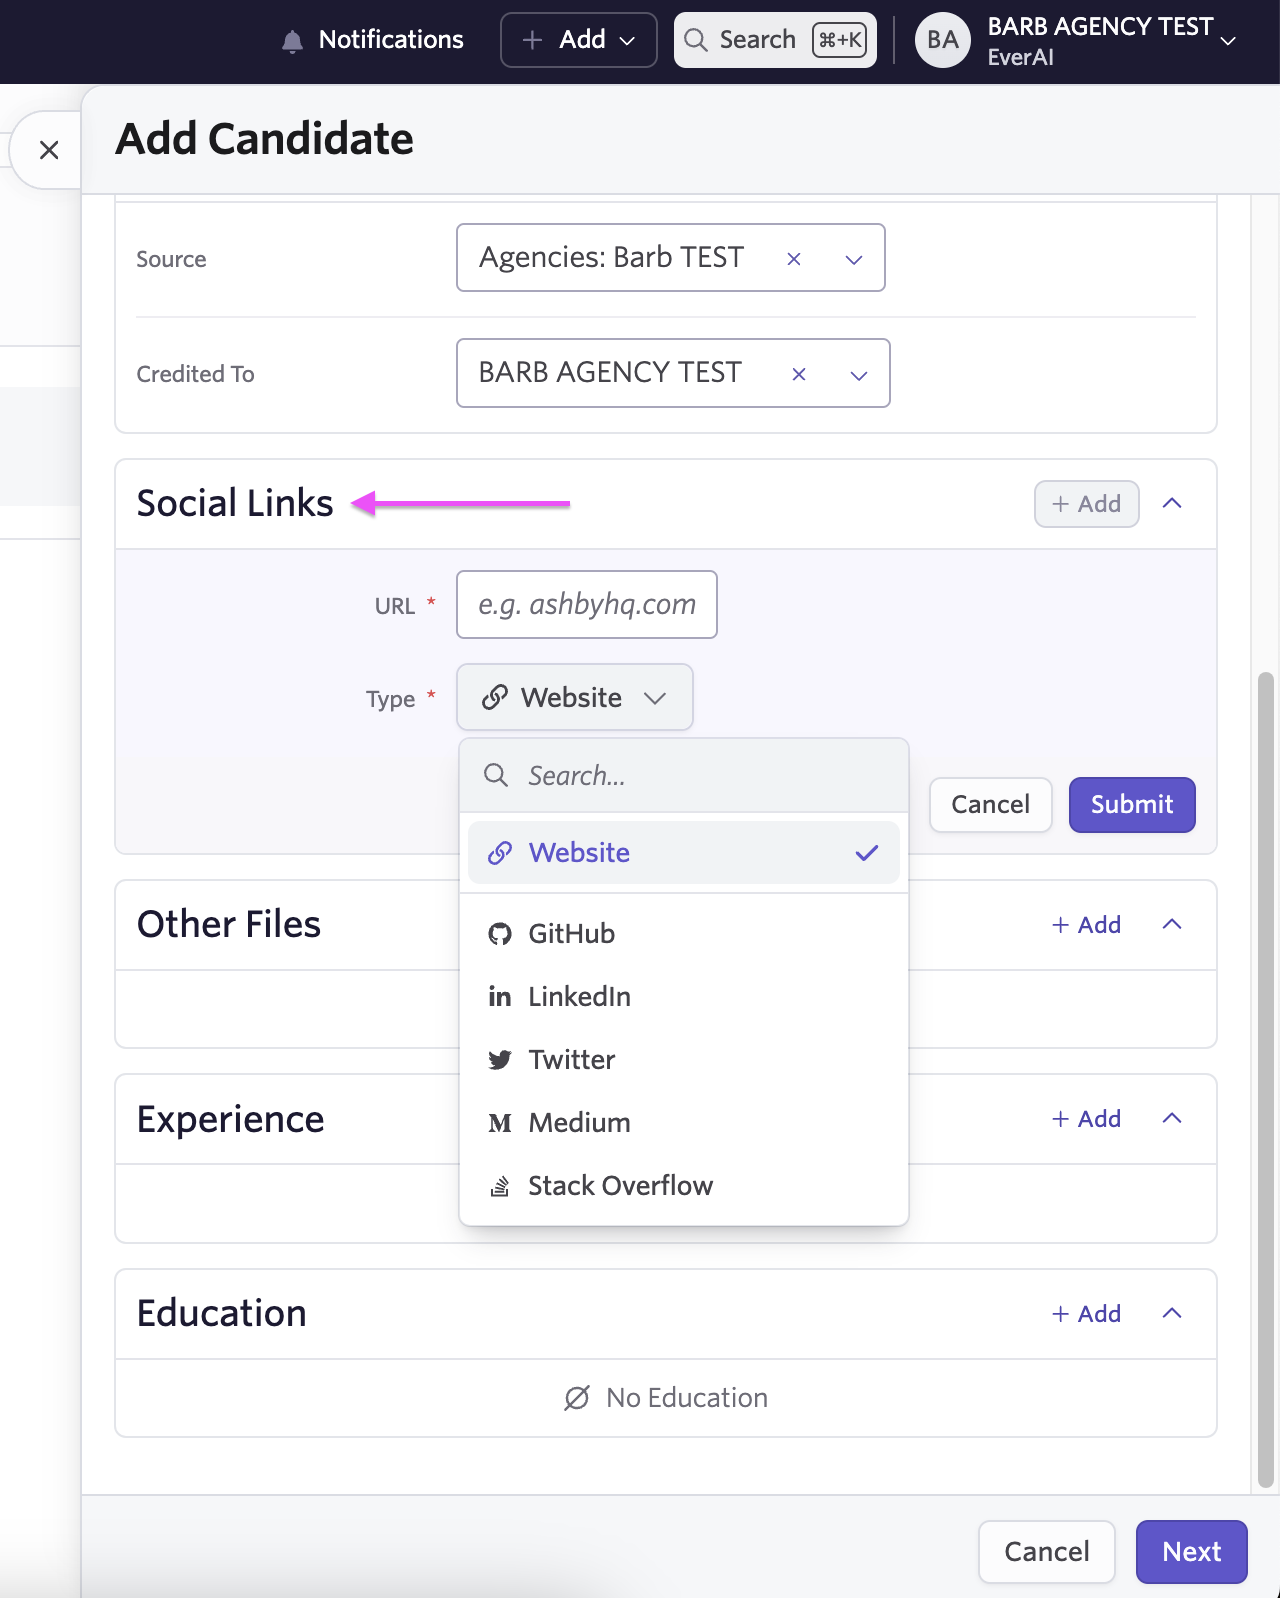
- Add Social Links to the Candidate's Profile:
- Click on the + Add button.
- In the dropdown, select the type of link:
- LinkedIn (mandatory): For all candidates (always add it, if the candidate has a LinkedIn profile).
- Website (optional): you can use the Website option for any additional websites, portfolios, blogs, or relevant URLs.
- GitHub/StackOverflow/Medium/Twitter (optional)
- Illustration here:
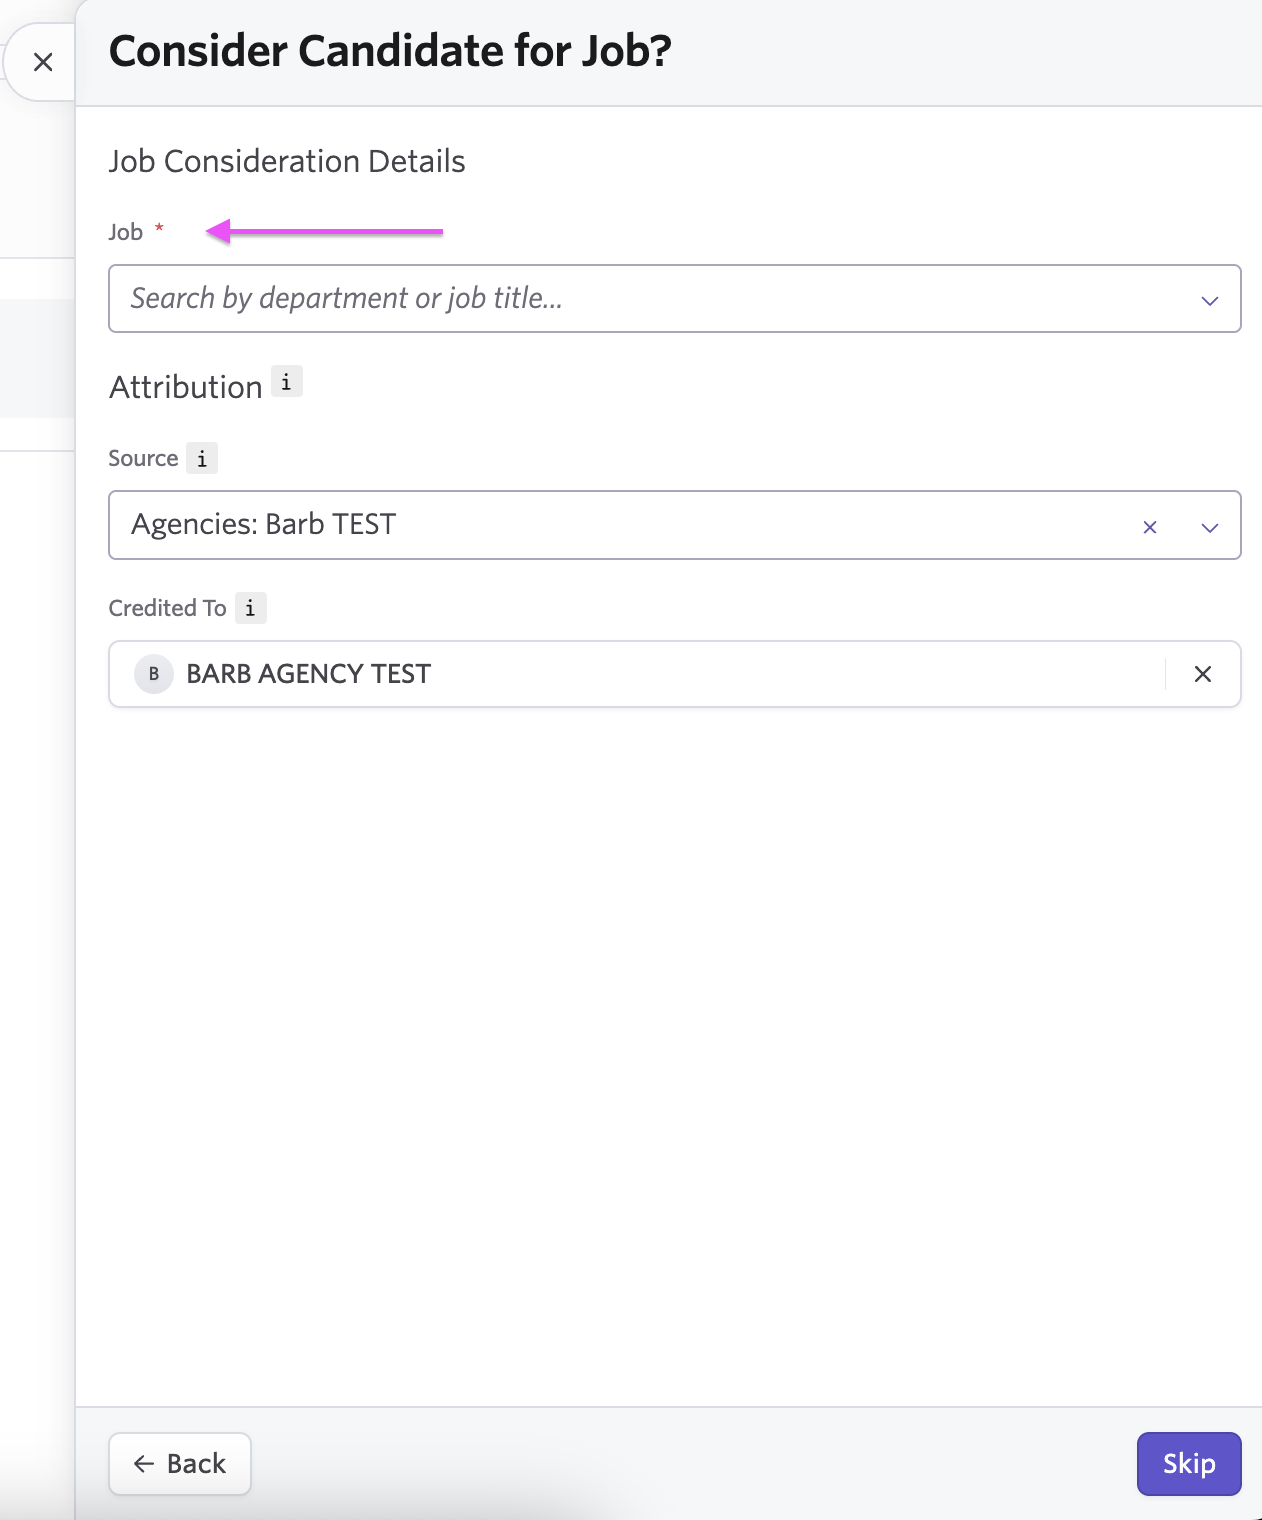
- Once you click on Next, add the Candidate to an Open Job:
- Select the Open Job:
- On the next screen, you will see a list of available job requisitions.
- Use the search bar or scroll to find the relevant job title.
- Assign the Candidate:
- Click on the job title to select it.
- Ensure the job matches the candidate's profile and skillset.
- Double-check the Attribution, if needed, as mentioned before.
- Illustration here:
- Select the Open Job:
- Click on Add to Job, to finalize.
- Tutorial video:
A video walkthrough of this step exists internally but isn't publicly shareable yet. Ask your TA contact if you'd like to see it.
- Upload the CV:
4Step 4: Check Candidates' Profiles
The Candidate Profile in Ashby is the central hub for managing and viewing all candidate details. It allows you to keep track of their progress and collaborate with your team effectively.
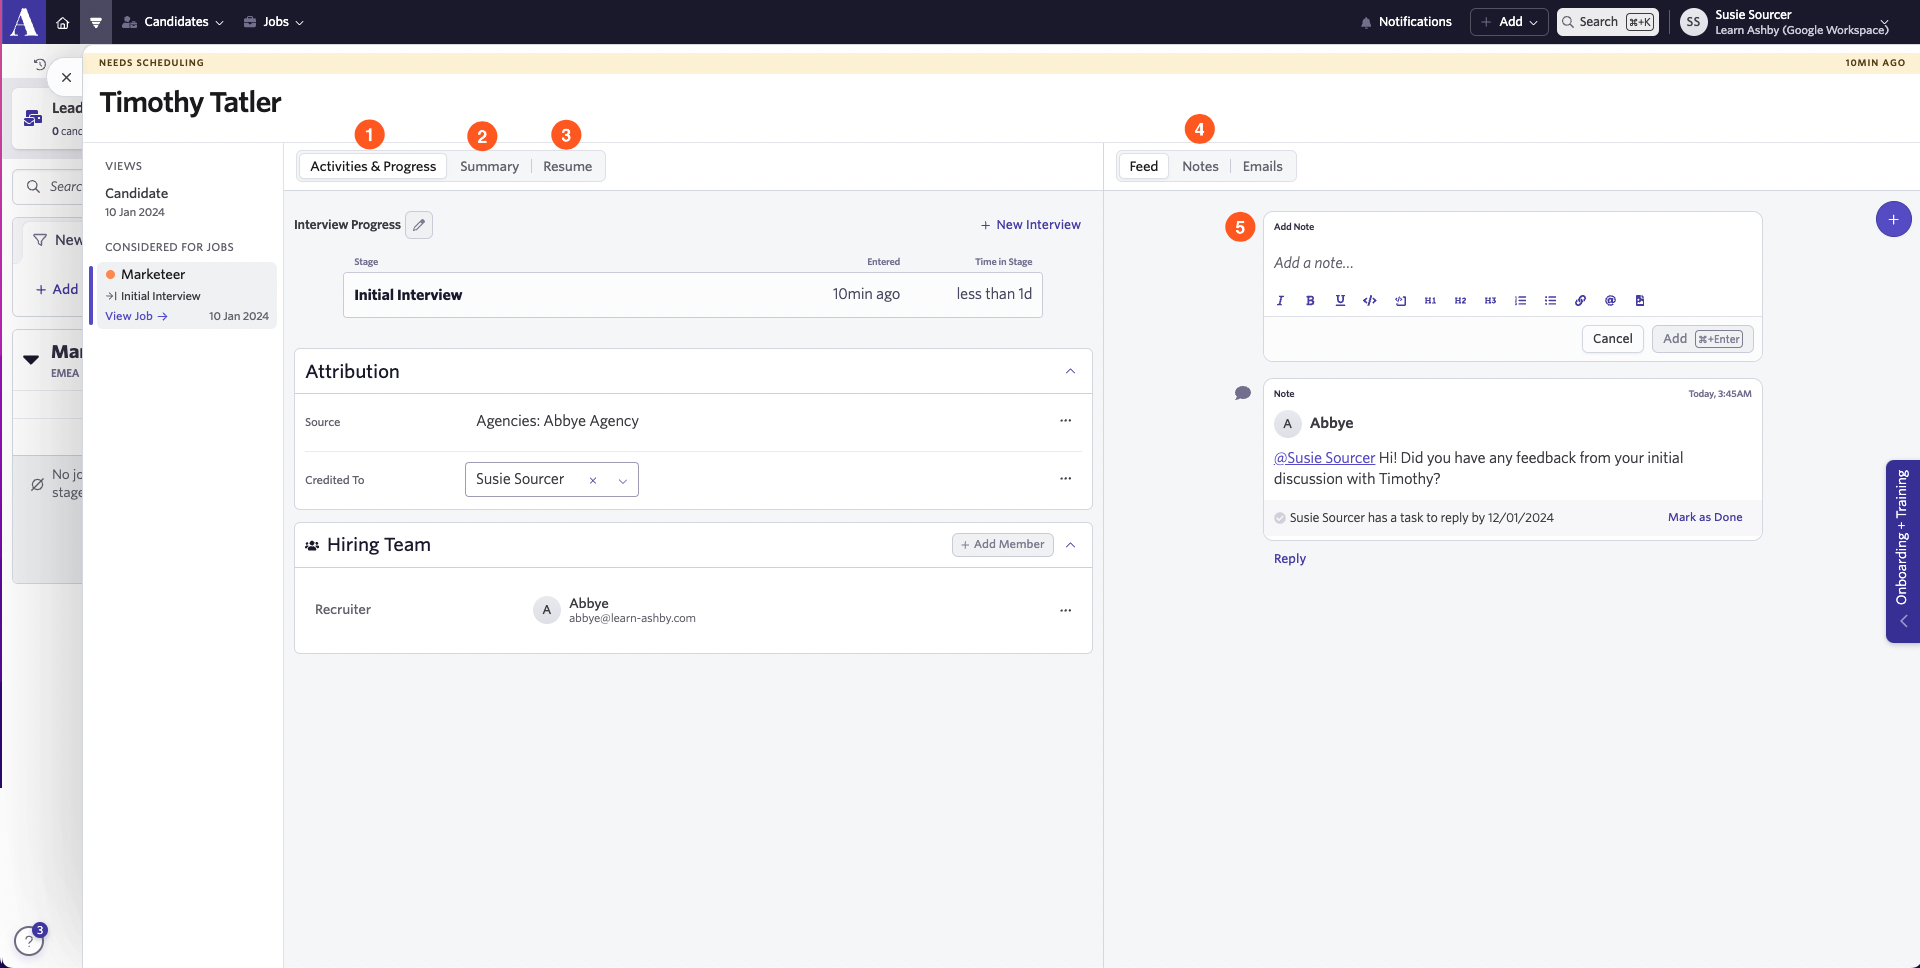
Here's a breakdown of the key areas:
1. Activities and Progress:
- View the candidate's progress through the interview stages.
- Track where they are in the hiring pipeline and update their status as needed.
2. Summary:
- Find essential candidate details such as:
- Name
- Location
- Quickly access the most important information at a glance.
3. Resume:
- Access and view the candidate's uploaded resume.
- Ensure the document is complete and formatted correctly.
4. Feed:
- View a chronological log of all activities related to the candidate, including:
- Notes
- Feedback
- Emails (if you have the necessary permissions).
- Use the Notes and Emails filters to customize your view and focus on specific updates.
5. Notes:
- Here, you can add detailed notes about the candidate, including observations or next steps.
- Mandatory: Use @mentions to involve other team members and assign tasks.
Please assign your TA contact to ALL candidates you add by @mentioning them, ensuring proper visibility. - Mandatory: Write down a note with this template:
- Location/Timezone:
- Visa/Right to Work:
- LinkedIn Profile:
- Portfolio or GitHub: (if applicable only)
- Salary Expectations:
- Preferred Currency for Salary payment:
- Type of Contract:
- Availability:
- Notice Period:
- Other Offers/Recruitment processes:
- Interview Recording Link:
- Notes/Summary:
- Check the Create Task box to turn the note into a task for better tracking and accountability.
Tutorial video here:
🛠️ Other Features
Candidate Pipeline
The Candidate Pipeline allows you to view your candidates across jobs and stages. You can use the search bar to search for specific candidates and the filters to pull candidates that meet specific criteria. From there, you can click on the arrow next to a job to view the pipeline and the candidates in each stage.
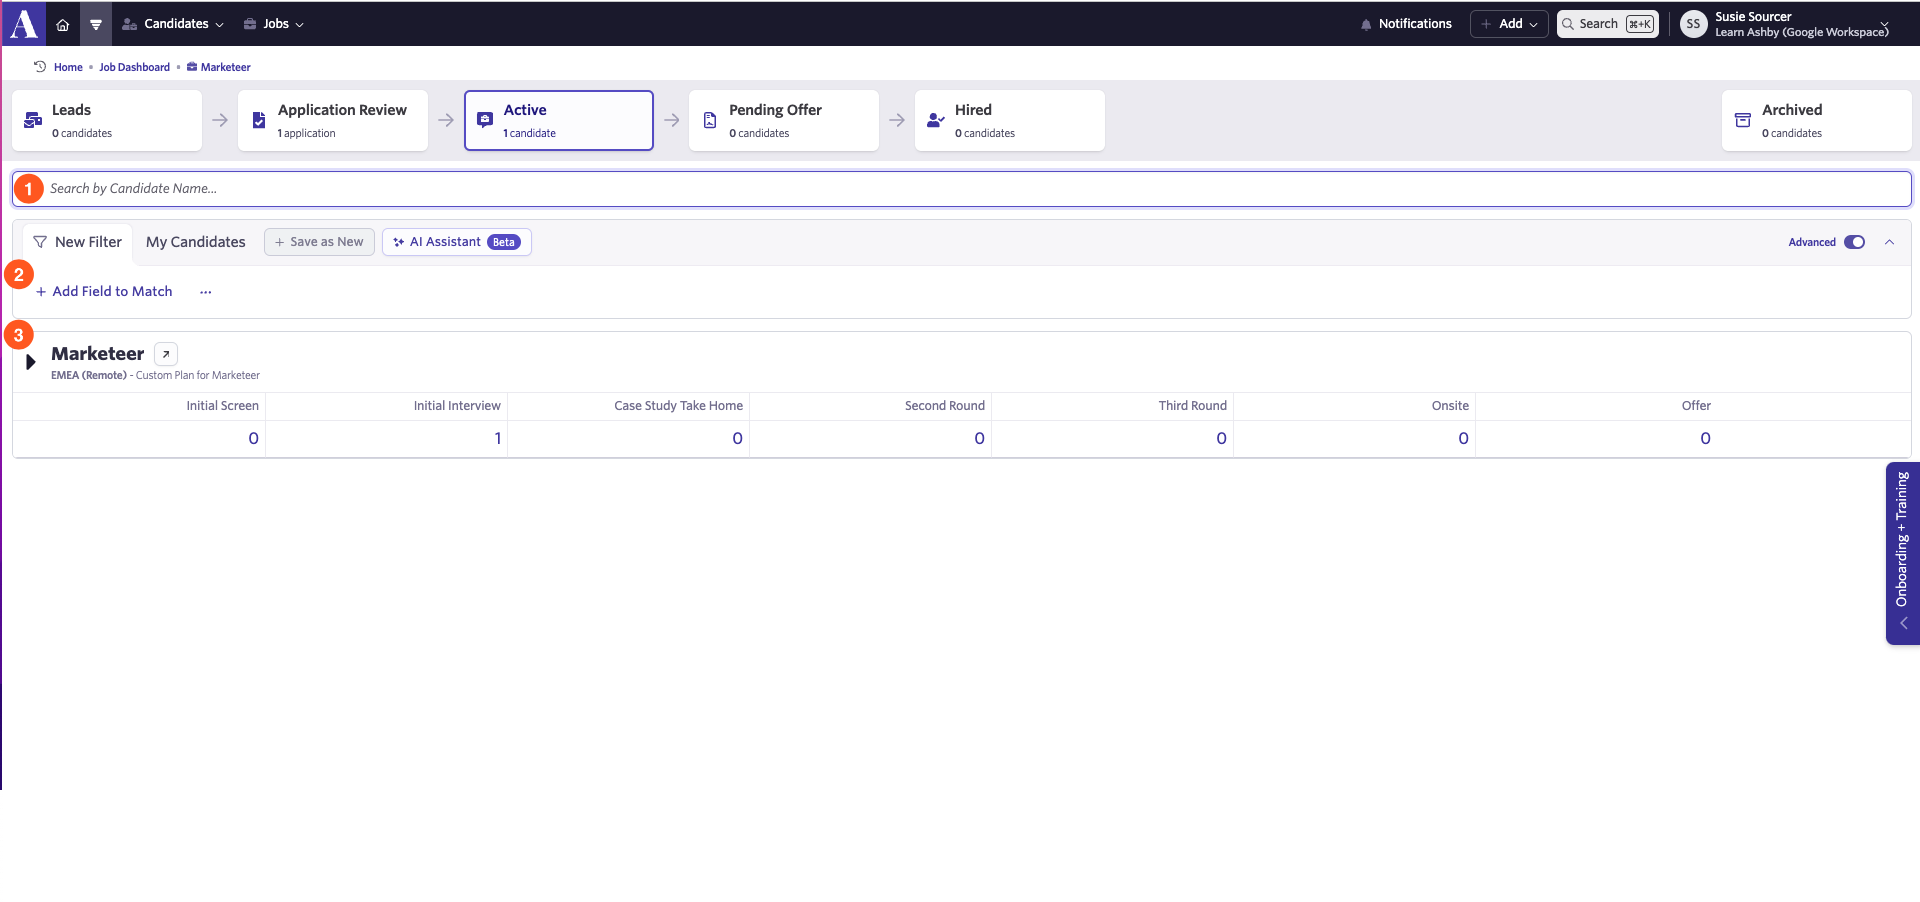
1) Search - Search for a candidate by name here.
2) Filters - Filter by specific criteria to pull the candidates you're looking for here.
3) Jobs and pipelines - jobs you have access to will be listed here, click the arrow to the left of the job title to open the pipeline and view the candidates in each stage.
Tasks
When someone @mentions you on a candidate's profile, or you have an overdue task to submit feedback on a candidate, a task will be created on your home page. You'll receive notifications via email until the task is resolved.
Personal Settings
Your Personal Settings are where you manage account settings specific to you, including your name, avatar, and notification settings. Under Notifications, you have the option to enable or disable email notifications for when:
- You are mentioned in a note
- A candidate is hired
- A candidate is moved to a new interview stage
- Someone replies to a note that you wrote
- You have overdue tasks (report sent daily)
💡 Additional Tips
Using the Ashby Chrome Extension
- Install the Ashby Chrome Extension to add candidates directly from LinkedIn.
- Visit a candidate's LinkedIn profile, open the extension, and click "Add to Ashby" to import their information.
Bulk Importing Candidates
- For adding multiple candidates simultaneously, use Ashby's bulk import feature.
- Ensure your data file is formatted correctly to match Ashby's requirements.
For more info and tutorials, please visit Ashby's Knowledge Base.
Thank you!